Dynamic content in the questionnaire

It is possible to integrate placeholders in your questionnaire that are dynamically replaced by dynamic content. Such placeholders can be used for e.g. the personal address of the participants (incl. first and last name) or for randomly distributed vouchers at the end of a survey.

How do I setup dynamic content?

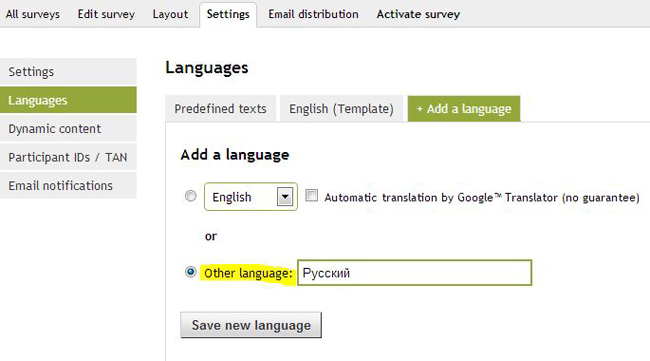
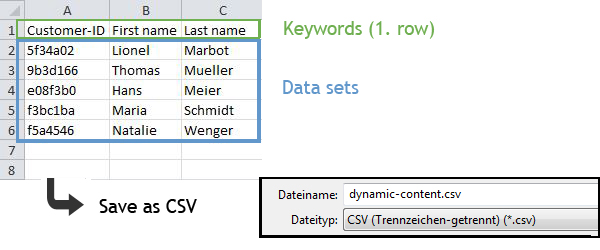
In the settings of your survey you will find the tab “Dynamic content”. After activating this function, you can start entering dynamic content by uploading an Excel- or CSV-file.

The first row of the file must contain the keywords (that are used as placeholders in the questionnaire). Every keyword (column description) must be unique. Subsequent rows must contain your data.

Data sets I

Simply upload your data file into the “Dynamic content” section.

Personalised output of data sets

Notice: Alternatively to the manual determination of the participant-IDs, dynamic content can also be embedded automatically in connection with the email distribution via eSurveyCreator.com. In this regard please read the following article: Automatic distribution of invitation emails in combination with dynamic content

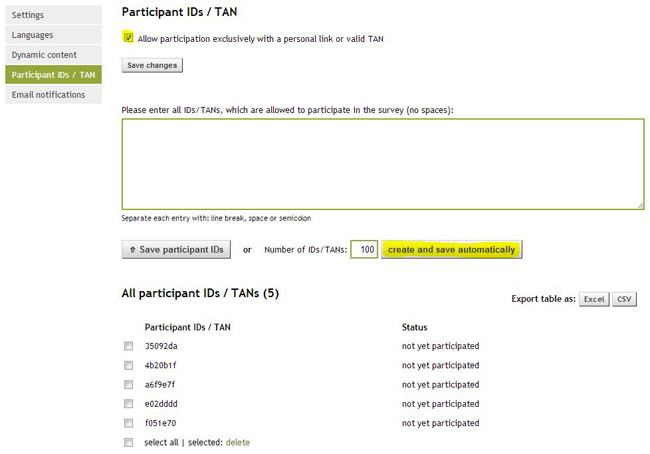
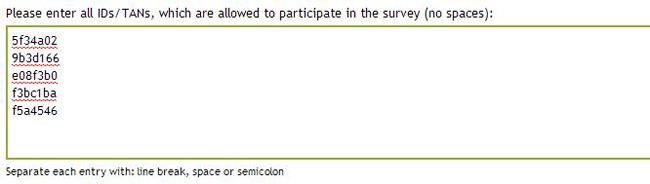
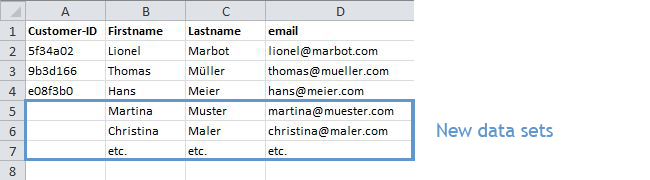
Additionally, an optional column can be defined as “Participant ID”, which can be used to individualise survey links (see the instructions personalised survey links). So if you use individualised links for your survey and you have also created such a column in the dynamic content, the system automatically recognises that the participant with the ID “XY” has to receive the data sets from the row with the same ID “XY”.

Keyword that containts participant ID + data sets

Thereby the placeholder [Firstname] will be replaced by Lionel, and [Lastname] will be exchanged by Marbot in the questionnaire of the participant with the survey link https://www.esurveycreator.com/s/123456&id=5f34a02.

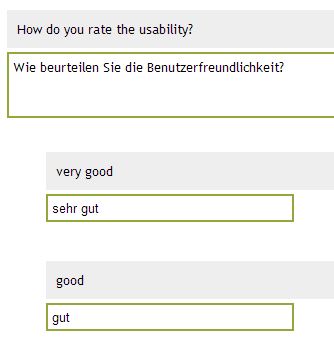
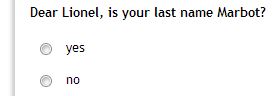
Thus, the following template…

First name, last name  

will be displayed to the participant with the ID 5f34a02 as follows:

first name, last name replaced  

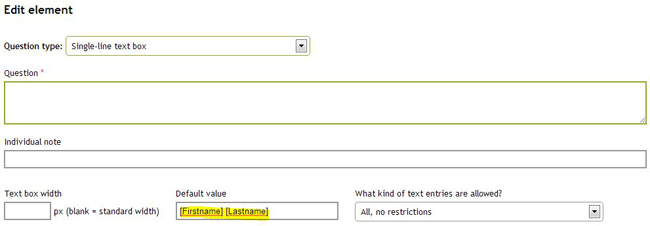
Dynamic content can also be used as predefined text in text boxes. Based on previous example, you can just add the placeholders [Firstname] and [Lastname] to the “default values” of the question types “Single-line text box” or “Multi-line text box”. Those keywords will also be replaced by the corresponding data sets in the questionnaire.

Placeholder default values

Hint:

In case that a keyword should return an empty data set (e.g. if you do not have this information), you can define an alternative text that is shown instead. This alternative text has to be added directly after the keyword (no space) within curly brackets. E.g. if your salutation line in the invitation email looks like the following: “Dear [Firstname]{customer},” and the dynamic content looks according to the below mentioned example…

   Empty data set

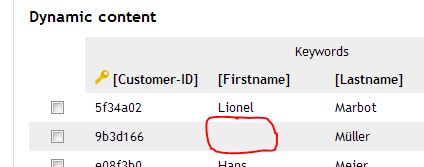
the participant with the ID 5f34a02 will be addressed by “Dear Lionel,…”. For the participant with ID 9b3d166, however, the invitation email will start with “Dear customer,…” (since no “Firstname” is defined).

Add new data sets

New data sets can be added directly beneath the existing list. In case you are using automatically generated participant IDs, the first column can be left empty. By adding email addresses from dynamic content to the recipient lists of the email distribution, random participant IDs will be automatically assigned to each recipient.

Add new data sets

Another option is to export the existing list as an Excel- or CSV-file (top right corner of the dynamic content) and to add the new data sets to this downloaded list. This alternative is way more convenient to add larger amounts of data. Here you can also leave the first row empty, when you do not use your own participant IDs.

Add new data sets Excel

As soon as the list is up to date, it can be saved and be uploaded again. When uploading the updated file, please choose the option “overwrite selected list“.

overwrite a new list

Random output of data sets

E.g. if you want to award the participants randomly with a voucher for having answered your questionnaire, you can upload a spreadsheet, which contains all your vouchers.

Create a new list vouchers

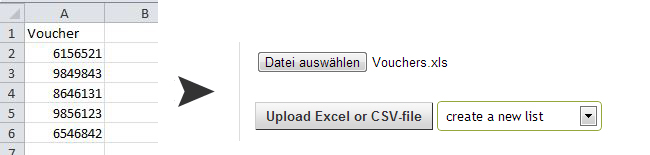
In the settings of the new list you can define, that each voucher can only be used once among all participants.

Data sets can only be used once among all

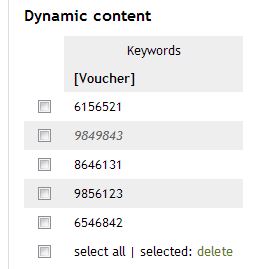
As no column is linked to a participant-ID, an arbitrary data set (voucher) will be given out by each occurrence of the keyword [Voucher] in the questionnaire.

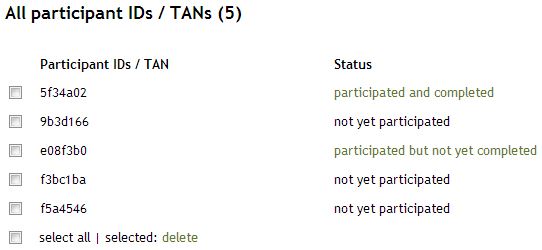
Used data sets won’t be used a second time. The already displayed data sets will be displayed in grey and italic.

Used voucher

Create multilingual surveys

If you want to conduct a survey in various languages you do not have to create a survey for each language separately. An existing questionnaire can be translated into different languages.

Procedure

First you should completely build the questionnaire in one language (template). You better not start with the translation until the main questionnaire has not been created entirely.

Enable multilingualism

The multilingualism can be activated in “Settings > Languages > Multilingual survey“.

Enable multilingualism II


Enter a new language

There are two different ways to enter a new language:

Default language: Select one of the default languages in the dropdown and click on “Save new language”:

Save new language II

By choosing a default language all predefined texts (error messages, etc.) will be automatically translated. When the option “Automatic translation” is activated, the whole questionnaire is automatically translated using “Google Translate”. You can modify these translations afterwards.

Other languages: If the needed language is not one of our default ones, you can add it manually.

Add other language

That way no automatic translation is done. You’ll have to enter all translations yourself (incl. error messages, etc.).


Translate the questionnaire

Highlighted with a grey background is the text from your template questionnaire. Just below you can enter the appropriate translation.

Translate questionnaire

Content that does not need to be translated (e.g. numbers) can be copied with a simple click on the down arrow on the left. Text fields already containing text will not be affected.

Autofill empty boxes multilingual survey


Please do not forget to save the entered translations (at the bottom of the page).

Save translation


Translation by a third party

If you do not want to translate the questionnaire by yourself, you can grant third parties access to your translations via a translation link.

Allow access for external translation II

With this link third parties only get access to the translation site and solely to the respective language. The questionnaire itself cannot be changed. A different unique link is generated for every language.

Unchecking this option revokes access immediately.

PS: By default the template language is shown as the basis of the translation (English in the above mentioned example). Sometimes it is required that another language is used as template (e.g. a questionnaire was created in English (template) and then translated to German. Now the questionnaire needs to be translated from German (and not from English) to French. For this purpose the language code of the respective language has to be added to the translation link (e.g. www.esurveycreator.com/translation/1234567-hijklmn&language=2). The number “2” in this code represents the language code, which can be found in the URL by selecting the required language.

Language code I


Language selection for the participants

As soon as the above mentioned steps are completed, the language selection will appear at the beginning of the questionnaire.

Select language


Preselect a language

Do you already know the language of your participants? Then you can modify the survey link in order to skip the language selection and directly show the correct language instead.

Let assume that this is your survey link: https://www.esurveycreator.com/s/1234567

With the add-on (&lang=n) you can define the language that has to be used, e.g.: https://www.esurveycreator.com/s/1234567&lang=1

In the below mentioned example the number “1” stands for “English” and the number “2” for “Deutsch”. The correct language code can be found in “edit survey” (in the URL), after having chosen the respective language:

Language code II

Now, when a participant opens the modified survey link, the language selection is skipped and the questionnaire automatically starts with the first page of the questionnaire in the selected language.


Evaluation

The chosen language of a participant can be retrieved in the raw data export (e.g. in Excel) of your results.

Language in raw data export

It is also possible to filter by language in the online evaluation.

Filter by language


Allow participation only with a valid TAN

When conducting a survey with a closed group of participants (e.g. employee survey) one sometimes have to make sure that only authorised people are able to participate. Additionally, those people should not be able to answer the questionnaire more than once.

Basically, there are two ways to achieve that: Via direct mass mailing via eSurveyCreator.com and/or via the distribution of TANs (both options can be combined as well). This article addresses the latter option.

In “Settings > Participant IDs / TAN” you can define that one can only participate in the survey entering a valid TAN.

Participant ID TAN

You can either enter all IDs/TANs manually or you can let them be generated automatically. All TANs can be exported as an Excel-/CSV-file (e.g. for the further distribution to all employees).

Using this option, every participant will have to enter their own valid TAN in order to being able to participate in the survey.

Access code

By default, using a TAN, one can only participate once. You can however change this in the settings of your survey to accept multiple participations. If a respondent interrupts his/her participation, he/she will be able to continue afterwards at the same point he/she left the survey by using the same TAN again.

Can a survey be conducted anonymously?

Yes, it is possible to conduct anonymous surveys and not being able to match collected results to individuals. This can be defined in the “settings” of the respective survey.

When using our  automatic “email distribution” respectively “participant-IDs / TANs”, collected results are automatically linked to the respective email address or TAN of the participant. By enabling the option “Anonymous survey” this connection will be suppressed (to ensure anonymity).

Anonymous survey

Caution: This setting can’t be undone!

Furthermore you can deactivate the saving of the IP-addresses (deactivated by default).

Save IP-adress

Use cross tabulation in your online results

Cross tabulations can be done in the automatic evaluation of your survey. To do so, you just have to click on the answer you want to focus on.

For example, having a gender question in your questionnaire, you can easily narrow down the evaluation to only female participants.

Cross tab gender IIBy clicking on “female”, only answers of female respondents will be displayed. You can define as many filters as you like, e.g. additional filters for the age, marital status, or whatever other questions you have in your questionnaire.

Filtered responses

In the top area of your evaluation you will see your active filters listed. They are also shown in the affected element/question. With just one click on the orange arrow directly aside a respective responding possibility the filters can be deleted.

Define logical workflows (skip logic)

According to the principle of “Don’t make me think” a questionnaire should be as simple and easy as possible. Not only will your participants benefit from a well-structured survey: Response rate might increase and that is great for you too.

The use of logical workflows (skip logic) avoids that participants need to answer irrelevant questions. E.g. when you ask in a questionnaire if the participant owns a car and he answers “no”, one should not be asked for the colour of his car in the next question. Logical workflows help to skip irrelevant questions on the basis of previously given responses.

Redirections based on responses

This feature can be used for closed questions with single selection.

What products do you use III

At a given question just click on “Edit logical workflow” and add a redirection rule according to your needs. Thereby you can make sure that only relevant questions are shown to the participant based on their previously given answers.


Once being set, the active redirections will be shown in the edited question:

What products do you use logical workflow

In this example no specific redirection is defined for the responding possibility “Product X”. Therefore, all participants who choose “Product X”  will continue with the next page of the questionnaire as normal.

By choosing “Product Y” participants will be redirected to “Page 3”. “Page 2” will be automatically skipped.

If somebody selects “None” he/she will automatically get to the end of the survey, as he/she does not belong to the target group.

Set redirections based on visited pages

Beneath every page (assuming that you have more than one page in your questionnaire) you’ll find the same functionality as above, with the slight difference, that they refer to the page and not to given answers.

Logical workflow page

This also helps you to guide your participants through your questionnaire:

skip-logic-based-on-visited-pages

Those “Site-redirections” will only be executed if no other logical workflows are defined within the same page (on questions).

A well-conceived questionnaire guides a participant through a survey, without showing him irrelevant questions. Please remember that the questionnaire needs to be separated into several pages before the redirections can be used.

“Display conditions” are useful as well to define such redirections.

Create individual survey links

When conducting a targeted survey, like a customer satisfaction survey, potential participants will be contacted individually. To be able to track those participants without asking for personal details in the questionnaire, survey links can be individualised.

Hint: By doing the email distribution directly with eSurveyCreator.com, the survey links will be automatically individualised. Thereby they do not have to be created manually. Here you will find all information about this feature: Send the invitation emails directly via eSurveyCreator.com

Personalised survey

Your first step is to create your questionnaire and activate it. By activating the survey, you will receive the general link to your survey, e.g. looking like this:

https://www.esurveycreator.com/s/1a2b3c

Now this link can be individualised with an arbitrary add on.

&id=46e2cfr

The “id” can be chosen randomly, but it must only contain the following characters: a-z, A-Z, 0-9, dash and underscore (no spaces). Examples:

https://www.esurveycreator.com/s/1a2b3c&id=qe83kL

https://www.esurveycreator.com/s/1a2b3c&id=8k4jcd

https://www.esurveycreator.com/s/1a2b3c&id=o34knc

etc.

With a personal survey link a participant can only participate once, irrespective of the IP-address and the Session-ID. The participant will be able to interrupt the participation by closing the browser and to continue later at the same point they left the survey before by reopening the survey link. Furthermore the chosen ID can be found in the evaluation of the survey. Thereby you are able to assign the collected answers to the particular participants and to determine who has already answered the questionnaire. This information can be very helpful for the distribution of reminder emails.

The use of individual survey links requires that you know your participants, since everyone must receive their very own link.

Closed group of participants

It is possible to conduct a closed survey, which is only accessible to a limited group of participants. This can be done by activating the function “Allow participation exclusively with a personal link or valid TAN” in the tab “Participant IDs / TAN” in the settings of the survey.


Participant IDs TAN

When this option is not activated, it is still possible to participate in the survey with the general survey link. In the same menu the “IDs/TANs” can be defined, which allow the participants to answer the questionnaire. The “IDs” underlie the same restrictions as mentioned before (individual links). They can either be created manually (without “&id” at the beginning):

Enter IDs, TANs Or they can be generated automatically:

Generate TANs

On the same page all entered IDs/TANs are shown with the corresponding status (not yet participated / participated but not yet completed / participated and completed).

Status Participant IDs

The data can be exported as Excel- and CSV-document. Furthermore, by clicking on the participation status, you can see the full results of this very participant only.